Overblog
Suivre ce blog Administration + Créer mon blog
15 février 2008 5 15 /02 /février /2008 20:17

Purpose

Here is a Pluggable Java Component that allows to have non rectangular buttons.

Because it uses the Gradient features, it needs, at least the Sun java plugin 1.4
It won't run against JInitiator

You can have shapes described by polygon coordinate pairs, and also button made by a single letter, a word or even, by a complete sentence.


Amazing Button


The Java code

     amazingbutton.java


The implementation class of the Push Button Item

     oracle.forms.fd.AmazingButton


The methods you can set

Because it is a PJC that extends VButton, you can use the standard Set_Item_Property() built-in to set the standard button's properties.


Draw a circle button - SET_CIRCLE

Set_Custom_Property( 'BL.BT', 1, 'SET_CIRCLE','');


Draw a losange button - SET_LOSANGE

Set_Custom_Property( 'BL.BT', 1, 'SET_LOSANGE','');


Draw a polygon button - SET_POLYGON

Set_Custom_Property( 'BL.BT', 1, 'SET_POLYGON','x,y[,x,y[,...]]');

e.g.
Set_Custom_Property( 'BL.BT', 1, 'SET_POLYGON','24,0,47,34,47,58,38,58,24,37,10,58,1,58,0,33,24,1');


Draw a text button - SET_TEXT

Set_Custom_Property( 'BL.BT', 1, 'SET_TEXT','text[,font_name[,font_weight[,font_size]]]');

e.g.
Set_Custom_Property( 'BL.BT', 1, 'SET_TEXT','The text,Tahoma,B,45');


Set the text shadow color - SET_SHADOW_COLOR

Set_Custom_Property( 'BL.BT', 1, 'SET_TEXT_SHADOW','rgb_color');

default color is grey (r160g160b160)

e.g.
Set_Custom_Property( 'BL.BT', 1, 'SET_TEXT_SHADOW','r129g25b222');


Set the text shadow shift - SET_SHADOW_SHIFT

Set_Custom_Property( 'BL.BT', 1, 'SET_SHADOW_SHIFT','x_shift,y_shift');

e.g.
Set_Custom_Property( 'BL.BT', 1, 'SET_TEXT_SHADOW','-5,-4');


When no given x=4 and y=3.

If you want to hide the shadow, provide 0,0


Set the text position - SET_TEXT_POSITION

Set_Custom_Property( 'BL.BT', 1, 'SET_TEXT_POSITION','left | center | right');

e.g.
Set_Custom_Property( 'BL.BT', 1, 'SET_TEXT_POSITION','left');


Set the text x,y position - SET_TEXT_AT

Set_Custom_Property( 'BL.BT', 1, 'SET_TEXT_AT','x_pos,y_pos');

e.g.
Set_Custom_Property( 'BL.BT', 1, 'SET_TEXT_AT','10,10');


Set the gradient colors - SET_GRADIENT

Set_Custom_Property( 'BL.BT', 1, 'SET_GRADIENT','rgb_color,rgb_color');

e.g.
Set_Custom_Property( 'BL.BT', 1, 'SET_GRADIENT','r230g154b117,r230g78b0');


Set the border color - SET_BORDER_COLOR

Set_Custom_Property( 'BL.BT', 1, 'SET_BORDER_COLOR','rgb_color');

e.g.
Set_Custom_Property( 'BL.BT', 1, 'SET_BORDER_COLOR','r225g50b30');


Set the rotation angle - SET_ROTATION

Set_Custom_Property( 'BL.BT', 1, 'SET_ROTATION','angle');

e.g.
Set_Custom_Property( 'BL.BT', 1, 'SET_ROTATION','90');


Scale the shape to fit the button's size - SCALE

Set_Custom_Property( 'BL.BT', 1, 'SCALE','true | false');

If not used, the shape is scaled by default.

e.g.
-- don't scale the shape --
Set_Custom_Property( 'BL.BT', 1, 'SCALE','false');


Draw the button's bounding box - DRAW_BORDER

Set_Custom_Property( 'BL.BT', 1, 'DRAW_BORDER','true | false');

e.g.
Set_Custom_Property( 'BL.BT', 1, 'DRAW_BORDER','true');


Draw all buttons' bounding boxes - DRAW_BORDER_ALL

Set_Custom_Property( 'BL.BT', 1, 'DRAW_BORDER_ALL','true | false');

e.g.
Set_Custom_Property( 'BL.BT', 1, 'DRAW_BORDER_ALL','true');


Draw the shape's bounding box - DRAW_CLIP_BORDER

Set_Custom_Property( 'BL.BT', 1, 'DRAW_CLIP_BORDER','true | false');

e.g.
Set_Custom_Property( 'BL.BT', 1, 'DRAW_CLIP_BORDER','true');


Draw all shapes' bounding boxes - DRAW_CLIP_BORDER_ALL

Set_Custom_Property( 'BL.BT', 1, 'DRAW_CLIP_BORDER_ALL','true | false');

e.g.
Set_Custom_Property( 'BL.BT', 1, 'DRAW_CLIP_BORDER_ALL','true');


Set a bevel background - SET_RELIEF

Set_Custom_Property( 'BL.BT', 1, 'SET_RELIEF','true | false');

e.g.
Set_Custom_Property( 'BL.BT', 1, 'SET_RELIEF','true');


Set a bevel background on every button - SET_RELIEF_ALL

Set_Custom_Property( 'BL.BT', 1, 'SET_RELIEF_ALL','true | false');

e.g.
Set_Custom_Property( 'BL.BT', 1, 'SET_RELIEF_ALL','true');


Set the Text button shadow thickness - SET_TEXT_THICKNESS

Set_Custom_Property( 'BL.BT', 1, 'SET_TEXT_THICKNESS','horizontal_thickness,vertical_thickness');

e.g.
Set_Custom_Property( 'BL.BT', 1, 'SET_TEXT_THICKNESS','6,6');


The sample dialog


     . Download the amazingbutton.zip file
     . Unzip the file
     . copy the amazingbutton.jar file in the <ORACLE_HOME>/forms/java directory
     . Edit your /forms/server/formsweb.cfg file to add the amazingbutton.jar .
     . Open the amazingbutton.fmb module (Oracle Forms 9.0.2)
     . Compile all and run the module


Partager cet article
Repost0
6 février 2008 3 06 /02 /février /2008 11:34

Purpose

Here is a Java Bean that allows to manage an "auto completion" Swing JComboBox.


Key Pressed


The Java code

     CBAutoCompletion.java     ComboBoxCompletion.java


The implementation class of the Bean Item

     oracle.forms.fd.ComboBoxCompletion


The methods you can set


Init the ComboBox values

-- Single value list --
Get_Custom_Property('BLOCK.ITEM',1,'
INIT','value[,value[,...]]');


e.g.:
-- initialise the ComboBox values --
Set_Custom_Property('BL.BEAN',1,'INIT','Ester,Jordi,Jordina,Jorge,Sergi');  


-- Twin value list (code+value) --

Get_Custom_Property('BLOCK.ITEM',1,'
INIT_TWIN','code,value[,code,value[,...]]');
code(stored value) is provided, then after value (displayed)


e.g.:
-- initialise the ComboBox values --
Set_Custom_Property('BL.BEAN',1,'INIT_TWIN','v1,Ester,v2,Jordi,v3,Jordina,v4,Jorge,v5,Sergi');


This method must be the first called.

If you need to incorporate NULL values in the list, use the equivalent INIT_NULL and INIT_TWIN_NULL methods.

To set the focus on the NULL value, use the SELECT_INDEX,'1' or SELECT_CODE,'' methods.

If the amount of data to transfer is greater than 4000 bytes, replace the INIT[_NULL] or INIT_TWIN[_NULL] methods by the equivalent ADD[_NULL] of ADD_TWIN[_NULL]:


  Set_Custom_Property('BL.BEAN',1,'CLEAR','');
  Set_Custom_Property('BL.BEAN',1,'ADD_TWIN','v1,Ester,v2,Jordi,v3,Jordina');
  Set_Custom_Property('BL.BEAN',1,'ADD_TWIN','v4,Jorge,v5,Sergi,v6,Theodor');
  Set_Custom_Property('BL.BEAN',1,'ADD_TWIN','......');
  Set_Custom_Property('BL.BEAN',1,'ADD_TWIN','[END_DATA]');


In this case, the last call to ADD_XXX methods must contains the [END_DATA] string.


Set the Font

Get_Custom_Property('BLOCK.ITEM',1,'SET_FONT','font_name[,font_weight[,font_size]]);

font_weight could be one of the following:


P  : Plain
B  : Bold
I : Italic
BI : Bold+Italic


e.g.:
-- set the font --
Set_Custom_Property('BL.BEAN',1,'SET_FONT','Arial,B,12');


Enable/disable the combobox

Get_Custom_Property('BLOCK.ITEM',1,'SET_ENABLED','true | false');


e.g.:
-- disable the ComboBox --
Set_Custom_Property('BL.BEAN',1,'SET_ENABLED,'false'); 


Show/hide the ComboBox values

Get_Custom_Property('BLOCK.ITEM',1,'SET_VISIBLE','true | false');


e.g.:
-- hide the ComboBox --
Set_Custom_Property('BL.BEAN',1,'SET_VISIBLE,'false'); 


Set the starting index (by position)

Get_Custom_Property('BLOCK.ITEM',1,'SELECT_INDEX','index_num');


e.g.:
-- set focus on the 3rd option --
Set_Custom_Property('BL.BEAN',1,'SELECT_INDEX','3'); 


Set the starting index (by code)

Get_Custom_Property('BLOCK.ITEM',1,'SELECT_CODE','code');


e.g.:
-- set focus on the 3rd option --
Set_Custom_Property('BL.BEAN',1,'SELECT_CODE','v2'); 


Set the starting index (by value) twin value list only

Get_Custom_Property('BLOCK.ITEM',1,'SELECT_VALUE','value);


e.g.:
-- set focus on the 3rd option --
Set_Custom_Property('BL.BEAN',1,'SELECT_VALUE','Jordi'); 


The event raised by the bean

SELECTION_CHANGED

Each time the end user change the current value of the combobox, a message is send to Forms.

You can get this message in the When-Custom-Item-Event trigger of the Bean Item:
The index number is read from the SELECTION_INDEX list parameter
The code is read from the SELECTION_CODE list parameter
The value is read from the SELECTION_VALUE list parameter


DECLARE
    eventName varchar2(30) := :system.custom_item_event;
    eventValues ParamList;
    eventValueType number;
    LC$Index  varchar2(10);
    LC$Code  varchar2(1000);
    LC$Value  varchar2(1000);
BEGIN
   IF (eventName='SELECTION_CHANGED') THEN
      eventValues := get_parameter_list(:system.custom_item_event_parameters);
      get_parameter_attr(eventValues,'SELECTION_INDEX',eventValueType, LC$Index);
      get_parameter_attr(eventValues,'SELECTION_Code',eventValueType, LC$Code);
      get_parameter_attr(eventValues,'SELECTION_VALUE',eventValueType, LC$Value);
    
      -- display the current selction --
      :BL.SELECT := '[' || LC$Index || '] (' || LC$Code || ') ' || LC$Value ;

   END IF;
END;


The sample dialog


     . Download the CBAutoCompletion.zip file
     . Unzip the file
     . copy the ComboBoxCompletion.jar file in the <ORACLE_HOME>/forms/java directory
     . Edit your /forms/server/formsweb.cfg file to add the ComboBoxCompletion.jar .
     . Open the CBAUTOCOMPLETION.fmb module (Oracle Forms 9.0.2)
     . Compile all and run the module

     The JAR file has to be signed.


Partager cet article
Repost0
25 janvier 2008 5 25 /01 /janvier /2008 14:59

Purpose

Here is a Java Bean that allows to get some client machine information.


Key Pressed


The Java code

     ClientInfos.java


The implementation class of the Bean Item

     oracle.forms.fd.ClientInfos


The methods you can get


Get all client information

Get_Custom_Property('BLOCK.ITEM',1,'GET_CLIENT_INFOS');


e.g.:
-- get all information --
:BL.INFOS := Get_Custom_Property('BL.BEAN', 1, 'GET_CLIENT_INFOS' ) ;


Get a particular client information

Get_Custom_Property('BLOCK.ITEM',1,'property');

where property could be one of the following:


OPERATING : Operating System
ARCHITECTURE : architecture
OSVERSION : OS version
IP : IP address
MAC : MAC address
JAVAVERSION : Java version
JAVAVENDOR : Java vendor
JAVAVENDORURL : Java vendor URL
JAVAHOME : Java vendor home page
JAVAVMSPECIFICATIONVERSION : Virtual machine version
JAVAVMSPECIFICATIONVENDOR : Virtual machine vendor
JAVAVMSPECIFICATIONNAME : Virtual machine name
USERNAME : user name
USERHOME : user home


e.g.:
-- get MAC address --
:BL.INFOS := Get_Custom_Property('BL.BEAN', 1, 'MAC' ) ;


The sample dialog


     . Download the clientinfos.zip file
     . Unzip the file
     . copy the clientinfos.jar file in the <ORACLE_HOME>/forms/java directory
     . Edit your /forms/server/formsweb.cfg file to add the clientinfos.jar .
     . Open the CLIENTINFOS.fmb module (Oracle Forms 9.0.2)
     . Compile all and run the module

     The JAR file has to be signed.


Partager cet article
Repost0
25 janvier 2008 5 25 /01 /janvier /2008 11:13

Purpose

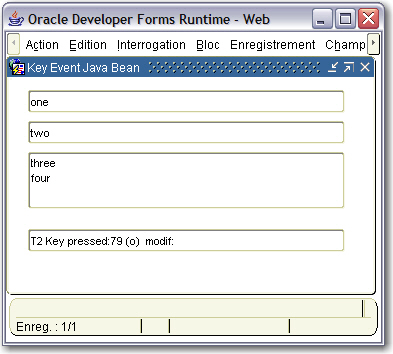
Here is a Java Bean that allows sending back to the Forms application each key pressed in any Text Item.


Key Pressed


The Java code

     keypressed.java


The implementation class of the Bean Item

     oracle.forms.fd.KeyPressed


The methods you can call


Initialize the bean

Set_Custom_Property('BLOCK.ITEM',1,'INIT','');

This method must be called in the When-New-Form-Instance. It is used to search for every Text Items in the Forms to attach to them a key listener.

e.g.:
-- Init the bean --
Set_Custom_Property( 'BL.BEAN', 1, 'INIT', '' ) ;


The event fired by the JavaBean


KEY_PRESSED


It is constituted by 3 parameters to get the key code, the key char and the key modifier.

To know what text item has just fired the event, ask the :SYSTEM.CURSOR_ITEM variable.

When-Custom-Item-Event:

DECLARE
  
    eventName varchar2(30) := :system.custom_item_event;
    eventValues ParamList;
    eventValueType number;
    LC$Code   varchar2(25); -- code
    LC$Char   varchar2(25); -- char
    LC$Modif  varchar2(25); -- modifier

  
BEGIN
  
   IF (eventName='KEY_PRESSED') THEN
      eventValues := get_parameter_list(:system.custom_item_event_parameters);
      get_parameter_attr(eventValues,'KEY_CODE',eventValueType, LC$Code);
      get_parameter_attr(eventValues,'KEY_CHAR',eventValueType, LC$Char);
      get_parameter_attr(eventValues,'KEY_MODIFIER',eventValueType,  LC$Modif);
     
      :BL.RESULT := :System.cursor_item || ' Key pressed:'|| LC$Code || ' (' || LC$Char||') '||' modif:'||LC$Modif ;
      Synchronize ;

   END IF; 
  
END;


The sample dialog


     . Download the keypressed.zip file
     . Unzip the file
     . copy the keypressed.jar file in the <ORACLE_HOME>/forms/java directory
     . Edit your /forms/server/formsweb.cfg file to add the keypressed.jar .
     . Open the KEYPRESSED.fmb module (Oracle Forms 9.0.2)
     . Compile all and run the module

Partager cet article
Repost0
21 décembre 2007 5 21 /12 /décembre /2007 13:14

Purpose

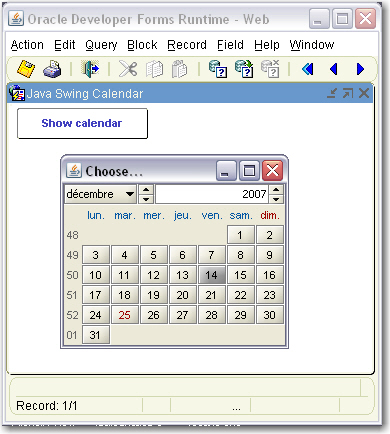
Here is a Java bean that allows to choose a date from a Java swing calendar.

The Java calendar itself is from Kai Toedter - Released under GNU Lesser General Public License - www.toedter.com

It needs the Sun Java plugin to run (won't run with JInitiator).

(the JInitiator 1.3.28 compatible version is downlodable at the end of the article)


JCalendar

Just double-click a day in the calendar to send an event to Forms with the date parameters.


The Java code

     JCalendar.java


The implementation class of the Bean Item

     oracle.forms.fd.JCalendar


The properties you can set


Set some properties

Set_Custom_Property('BL.BEAN', 1, 'SET_PROPERTY', 'property_name,property_value');

property_name can be one of the following:

  • title : set the frame title
  • background : set the background color
  • foreground : set the foreground color
  • decorationforeground : set the decoration foreground color (Sun plugin only)
  • sundayforeground : set the sunday foreground color (Sun plugin only)
  • weekdayforeground : set the week day foreground color (Sun plugin only)
  • date : set the starting date (year,month,day) (Sun plugin only)
  • locale : set a new Locale
  • plasticLAF : set the PlasticLAF Look & Feel
  • log : set the trace to the Java console (true | false)

colors are sent with the following format : rXgXbX where x must be between 0 and 255

e.g. :
Set_Custom_Property('BL.BEAN',1, 'SET_PROPERTY','plasticLAF,true');
Set_Custom_Property('BL.BEAN',1, 'SET_PROPERTY','log,true');
Set_Custom_Property('BL.BEAN',1, 'SET_PROPERTY','title,Choose...');
Set_Custom_Property('BL.BEAN',1, 'SET_PROPERTY','locale,US');
Set_Custom_Property('BL.BEAN',1, 'SET_PROPERTY','foreground,r128g50b50');

Set_Custom_Property('BL.BEAN',1, 'SET_PROPERTY','date,2007,12,25');


Show the calendar


Set_Custom_Property('BL.BEAN', 1, 'SHOW_CALENDAR', '[x_position,y_position]');


If x_position and y_position are given, the calendar will be shown at this position (top-left corner).

e.g:
-- show calendar --
Set_Custom_Property('BL.BEAN',1, 'SHOW_CALENDAR','');

-- show calendar at position 50,50 --
Set_Custom_Property('BL.BEAN',1, 'SHOW_CALENDAR','50,50');


The event received from the Bean

CALENDAR_EVENT


this event tells Forms that a date has been chosen in the calendar.
You can get it in a WHEN-CUSTOM-ITEM-EVENT event:

DECLARE
   
    eventName varchar2(30) := :system.custom_item_event;
    eventValues ParamList;
    eventValueType number;
    LC$Date   varchar2(256); -- complete date
    LC$Day    varchar2(256); -- day number (1-31)
    LC$Month  varchar2(256); -- month number (1-12)
    LC$Year   varchar2(256); -- year number
   
BEGIN
   
   IF (eventName='CALENDAR_EVENT') THEN
      eventValues := get_parameter_list(:system.custom_item_event_parameters);
      get_parameter_attr(eventValues,'CALENDAR_EVENT_DATE',eventValueType, LC$Date);
      get_parameter_attr(eventValues,'CALENDAR_EVENT_DAY',eventValueType, LC$Day);
      get_parameter_attr(eventValues,'CALENDAR_EVENT_MONTH',eventValueType, LC$Month);
      get_parameter_attr(eventValues,'CALENDAR_EVENT_YEAR',eventValueType, LC$Year);
      Clear_Message;
      Message('Selected date:'|| LC$Date || '(' || LC$Day||'/'||LC$Month||'/'||LC$Year || ')');
      Synchronize ;           
   END IF;  
   
END;


The sample dialog

     . Download the JCalendar.zip file
     . Unzip the file
     . copy the FJCalendar.jar, jcalendar-1.3.2.jar and looks-2.0.1.jar files in the <ORACLE_HOME>/forms/java directory
     . Edit your /forms/server/formsweb.cfg file to add these 3 JAR files
     . Open the JCALENDAR.fmb module (Oracle Forms 9.0.2)
     . Compile all and run the module

     the FJCalendar.jar file must be signed.
     the jar file provided in this article is already signed.


Jinitiator 1.3.28 compatible version

     . Download the JCalendarJinit.zip file
     . Unzip the file
     . copy the JCalendarJinit.jar and jcalendar.jar files in the <ORACLE_HOME>/forms/java directory
     . Edit your /forms/server/formsweb.cfg file to add these 2 JAR files

     . The Implementation Class property must be : oracle.forms.fd.JCalendarJinit

Partager cet article
Repost0
20 décembre 2007 4 20 /12 /décembre /2007 11:00

Purpose

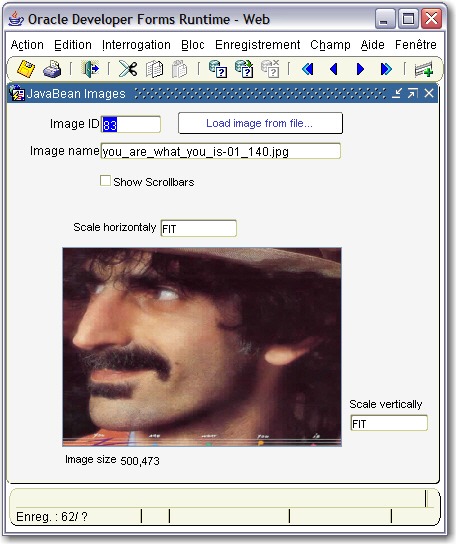
Here is a Java Bean that allows reading, displaying with scaling and writing images.

It allows scaling images to fit the target item size, and includes a FileChooser with image preview dialog.

In its third version, it does not need any JDBC connexion to handle images from/to the database
.

It uses the JRE 1.4 javax.imageio.ImageIO package, so it needs, at least the Sun Java plugin 1.4.
It won't run against JInitiator.


handleimage3


The Java code

     HandleImage.java      GetImageFileName.java


The implementation class of the Bean Item

     oracle.forms.fd.HandleImage


The methods you can call


Read an image from a file

Set_Custom_Property('BLOCK.ITEM',1,'READIMGFILE','the_complete_filename');

e.g.:
-- read image from the file system --
Set_Custom_Property( 'BLZ.BEAN', 1, 'READIMGFILE', 'D:/image.jpg' ) ;
 

-- read image from the JAR file --
Set_Custom_Property( 'BLZ.BEAN', 1, 'READIMGFILE', '/image.jpg' ) ;

-- read image from the Internet --
Set_Custom_Property( 'BLZ.BEAN', 1, 'READIMGFILE', 'http://the_url/image.jpg' ) ;


Read an image from the database table

The reading process is composed by three steps:

1. Select the Blob table's column
2. Read the image chunks and send them to the Java Bean
3. End the sending process


1. Select the Blob table's column:

Pkg_Read_Blob_Image.Select_Blob(LC$Clause); (*)

LC$Clause is a string that must contain the Select order to fetch the corresponding single row:

 LC$Clause := 'Select PHOTO_JAVA From PHOTOS Where IDENTIFIANT = 10'  ;
 -- Select the Blob column --
 If Pkg_Read_Blob_Image.Select_Blob(LC$Clause) Then
    ...


2. Read the image chunks from the database then send them to the Java Bean:

Pkg_Read_Blob_Image.Get_B64_Chunk() (*)

     -- Get the image chunks from the database --
     LC$Image := Pkg_Read_Blob_Image.Get_B64_Chunk ;
     If LC$Image Is Not Null Then
       -- Send the chunks to the Java Bean --
       Set_Custom_Property( 'BLZ.BEAN', 1, 'READIMGBASE', LC$Image ) ;

3. End the sending process:

     Else
       -- End the sending process --
       Set_Custom_Property( 'BLZ.BEAN', 1, 'READIMGBASE', '[END_IMAGE]' )
;


(*) the PKG_READ_BLOB_IMAGE database's package is provided with the zip file.


e.g.:

PROCEDURE Read_Image IS
  LB$Ok      boolean ;
  LC$Image   Varchar2(32767) ;
  LC$Clause  Varchar2(4000) ;
BEGIN
 
 --
 -- Read an image from the database
 --
 LC$Clause := 'Select PHOTO_JAVA From PHOTOS Where IDENTIFIANT = ' || :PHOTOS.IDENTIFIANT ;
 -- Select the Blob column --
 If Pkg_Read_Blob_Image.Select_Blob(LC$Clause) Then
   Loop
     -- Get the image chunks from the database --
     LC$Image := Pkg_Read_Blob_Image.Get_B64_Chunk ;
     If LC$Image Is Not Null Then
       -- Send the chunks to the Java Bean --
       Set_Custom_Property( 'BLZ.BEAN', 1, 'READIMGBASE', LC$Image ) ;
     Else
       -- End the sending process --
       Set_Custom_Property( 'BLZ.BEAN', 1, 'READIMGBASE', '[END_IMAGE]' ) ;
       Exit ;
     End if ; 
   End loop ;
 End if ; 
  
END;


Put this method into the When-New-Record-Instance block-level trigger


Write an image to the database table

The writing process is also composed by three steps:

1. Initialize the transfer
2. Read the image chunks from the Java Bean and send them to the database
3. Update the Blob column with the new content


1. Initialize the transfer:

Pkg_Read_Blob_Image.Init_Transfer() (*)

This will empty the current Blob column:

 Pkg_Read_Blob_Image.Init_Transfer ;

2. Read the image chunks from the Java Bean and send them to the database:

Get_Custom_Property('BLZ.BEAN',1,'GETIMAGE');

Pkg_Read_Blob_Image.Set_B64_Chunk(LC$Req) (*)

    Loop
      -- Get the image chunk from the Java Bean --
      LC$Req := Get_Custom_Property('BLZ.BEAN',1,'GETIMAGE');
      Exit When LC$Req is null ;
      ...   
      -- Send the image chunks to the Database --
      Pkg_Read_Blob_Image.Set_B64_Chunk(LC$Req);
    End loop;

3. Update the Blob column with the new content:

     LC$Res := Pkg_Read_Blob_Image.Save_Blob('PHOTOS','PHOTO_JAVA','IDENTIFIANT=' || :PHOTOS.IDENTIFIANT );

The Save_Blob() function takes the table name, the blob column name and the Where clause arguments.


(*) the PKG_READ_BLOB_IMAGE database's package is provided with the zip file.

Put this method into the Post-Insert and Post-Update block-level trigger

e.g.:

PROCEDURE Save_Image IS
    LC$Req  Varchar2(32000);
    LN$Cpt  Pls_integer := 0 ;
    LC$Res  Varchar2(2000) ;
BEGIN
    --
    -- Save the image to the database
    --
    Loop
      -- Get the image chunk from the Java Bean --
      LC$Req := Get_Custom_Property('BLZ.BEAN',1,'GETIMAGE');
      Exit When LC$Req is null ;
      LN$Cpt := LN$Cpt + 1 ;
      If Ln$Cpt = 1 Then
         Pkg_Read_Blob_Image.Init_Transfer ;
      End if ;  
      -- Send the image chunks to the Database --
      Pkg_Read_Blob_Image.Set_B64_Chunk(LC$Req);
    End loop;
    If LN$Cpt > 0 Then
      -- Update the Blob column with the new content --
      LC$Res := Pkg_Read_Blob_Image.Save_Blob('PHOTOS','PHOTO_JAVA','IDENTIFIANT=' || :PHOTOS.IDENTIFIANT );
    End if ;
    Clear_Message ;
    Message('Result:'|| LC$Res, no_acknowledge);
END;


Put this method into the Post-Insert and Post-Update block-level triggers


Clear the image

Set_Custom_Property( 'BL.BEAN', 1, '
CLEAR' , '' ) ;

This function has to be called in a When-New-Record-Instance trigger if the record does not exist:

When-New-Record-Instance trigger:
If :PHOTOS.IDENTIFIANT is not null Then
   Read_Image ;
Else
   Set_Custom_Property( 'BLZ.BEAN', 1, 'CLEAR', '' ) ;
End if ;
:BLZ.IMG_SIZE := Get_Custom_Property( 'BLZ.BEAN', 1, 'GETSIZE' ) ;


Set the display image scalling

This function concerns only the image displayed. The image stored with the WRITEIMGBASE method will be the initial image.

Set_Custom_Property( 'BL.BEAN', 1, '
SCALE_IMAGE
','Width=x,Height= y' ) ;

Both Width and Height parameters must be transmitted

x and y can take the following values:


Any value greater then 0 that express an absolute size in pixels
the special value: FIT that extends the image to fit the exact size of the image panel' size
-1 that to keep the corresponding aspect ratio
0 that indicates no scale at all


Examples:

-- Scale the image to fit horizontally and vertically the image item --

Set_Custom_Property('BLZ.BEAN',1,'SCALE_IMAGE', 'Width=FIT,Height=FIT' ) ;

-- Scale the image to 200x100 pixels --
Set_Custom_Property('BLZ.BEAN',1,'SCALE_IMAGE', 'Width=200,Height=100' ) ;

-- Scale the image to 200 horizontal pixels and keep vertical aspect ratio --
Set_Custom_Property('BLZ.BEAN',1,'SCALE_IMAGE', 'Width=200,Height=-1' ) ;


Display/hide the image panel' scrollbars

Set_Custom_Property('BLOCK.ITEM',1,'SETSCROLL','true|false');


e.g.:
Set_Custom_Property( 'BLZ.BEAN', 1, 'SETSCROLL', 'true' ) ; 


Set the item border

Set_Custom_Property('BLOCK.ITEM',1,'SETBORDER','thick[,color]');


e.g.:

-- set a null border --
Set_Custom_Property( 'BLZ.BEAN', 1, 'SETBORDER', '0' ) ; 

-- set a 4 pixel red border --
Set_Custom_Property( 'BLZ.BEAN', 1, 'SETBORDER', '4,r255g0b0' ) ; 


Set the JFileChooser title and starting directory

Set_Custom_Property('BLOCK.ITEM',1,'SET_FILECHOOSER_TITLE','title[,directory]');

e.g.:
Set_Custom_Property( 'BLZ.BEAN', 1, 'SET_FILECHOOSER_TITLE', 'Select a file,D:/' ) ; 

the directory argument is not mandatory


Set the JFileChooser Look and Feel


Set_Custom_Property('BLOCK.ITEM',1,'SET_FILECHOOSER_LAF','SYSTEM|other_value');


e.g.:
-- use the current O.S. L&F --
Set_Custom_Property( 'BLZ.BEAN', 1, 'SET_FILECHOOSER_LAF ', 'SYSTEM' ) ;
 

-- use the Metal L&F --
Set_Custom_Property( 'BLZ.BEAN', 1, 'SET_FILECHOOSER_LAF ', 'JAVA' ) ;


Set the log mode to output the Bean messages

Set_Custom_Property( 'BL
.BEAN', 1, 'SETLOG' , 'true|false' ) ;


In the sample dialog provided, here is the code used in the When-New-Form-Instance trigger:

PROCEDURE InitForm IS
BEGIN
  -- switch the log to true --
  Set_Custom_Property( 'BLZ.BEAN', 1, 'SETLOG', 'true' ) ;
  -- set the baen image bckground color --
  Set_Custom_Property( 'BLZ.BEAN', 1, 'SETBG', '255,255,255' ) ;
  -- Set the JFileChooser title --
  Set_Custom_Property( 'BLZ.BEAN', 1, 'SET_FILECHOOSER_TITLE',  'Select an image file' ) ;
  -- Set the JFileChooser L&F --
  Set_Custom_Property( 'BLZ.BEAN', 1, 'SET_FILECHOOSER_LAF', 'SYSTEM' ) ;
  -- scalling properties --

  Set_Custom_Property('BLZ.BEAN',1,'SCALE_IMAGE','Width=FIT,Height=FIT' ) ;
  -- display scrollbars policy --
  Set_Custom_Property( 'BLZ.BEAN', 1, 'SETSCROLL',  'false' ) ;
 
END;

Here is the description of the database table used:

CREATE TABLE PHOTOS
   (   
      "IDENTIFIANT" NUMBER(5,0) NOT NULL ENABLE,
      "NOM" VARCHAR2(50 BYTE),
      "PHOTO" BLOB,
      "PHOTO_JAVA" BLOB,
      CONSTRAINT "PHOTO_PK" PRIMARY KEY ("IDENTIFIANT") ENABLE
   )
/


The properties you can get from the JavaBean


Get the image size

Varchar2 :=
Get_Custom_Property( 'BL.BEAN', 1, 'GETSIZE'
) ;

The format returned (width,height) is like the following : 50,120


Get the
selected filename (JFileChooser)

Varchar2 :=
Get_Custom_Property( 'BL.BEAN', 1, 'GET_FILE_NAME' ) ;

this method both displays the JFileChooser and returns the selected file.


Get the current image chunks

Varchar2 :=
Get_Custom_Property( 'BL.BEAN', 1, 'GETIMAGE' ) ;

This method returns the last image read by the READIMGFILE() method..
It returns null when the image is completly read.


The events raised to Forms


Two events are raised by the Java Bean to Forms:


MOUSE_CLICKED and MOUSE_DOUBLECLICKED that you can trap through the When-Custom-Item-Event trigger:


DECLARE
    eventName varchar2(30) := :system.custom_item_event;
    eventValues ParamList;
    eventValueType number;
BEGIN
   IF (eventName='MOUSE_DOUBLECLICKED') THEN
      Message('Mouse double-click',no_acknowledge);
   ElsIF (eventName='MOUSE_CLICKED') THEN
      Message('Mouse click',no_acknowledge);
   END IF;
END;


The sample dialog


     . Download the handleimage3.zip file
     . Unzip the file
     . run the create_table.sql script under the Oracle user you want to test (It creates the sample image table).
     . run the PKG_READ_BLOB_IMAGE.sql script under the Oracle user you want to test (It creates the database package).
     . copy the handleimage3.jar file in the <ORACLE_HOME>/forms/java directory
     . Edit your /forms/server/formsweb.cfg file to add the handleimage3.jar .
     . Open the HANDLEIMAGE3.fmb module (Oracle Forms 9.0.2)
     . Compile all and run the module


Note : If you rebuild the jar file, it has to be signed. (the handleimage3.jar file provided in this article is already signed).
Partager cet article
Repost0
6 novembre 2007 2 06 /11 /novembre /2007 13:11

This Java Bean allows to process massive updates to the Forms source files (.FMB) through an XML input file.


Purpose


The goal is to hide the complexity of the Java/JDAPI stuff for those people that do not have time/skill to implement this Java API.

 
All the work expected to be done on the FMB files is described in a XML file.

JDAPI Utility

Three main sections are implemented to achieve the following:

  • section 1: define the global settings
  • section 2: do the job on all the modules given
  • section 3: do the job on each named module given

This Bean has been constructed as an enhanced Java Bean (using the FBean package), so it can be executed outside the Forms environment, from JDeveloper or from the command line.

I have tested it successfully under Forms 9i and the Sun Java plug in 1.5, but I have also encountered many problems while trying running it with Forms 10g and Sun Java plug in 1.6 or under the JInitiator.

This is the reason why I have added the possibility to run the stuff from the JAR file via the java.exe program called through the Host() Forms built-in.

 At this very moment (version 1.0) it can achieve the following:


  • Change the PL/SQL attached libraries name case to lower or upper case.
  • Attach a PL/SQL library
  • Remove a PL/SQL library
  • Add a Forms trigger
  • Remove a Forms trigger
  • Add a program unit
  • Remove a program unit
  • Delete PL/SQL code part from a trigger/program unit
  • Replace PL/SQL code part from a trigger/program unit
  • Add OLB sublassed object
  • do all available property setting on:
    • Alerts
    • Windows
    • Canvas
    • Blocks
    • Items
    • Editors
    • LOVs
    • Record Groups
    • Visual Attributes


To know what properties can be set to this last objects, study the JDAPI documentation and particularly the following classes:


  • oracle.forms.jdapi.Alert
  • oracle.forms.jdapi.Block
  • oracle.forms.jdapi.Canvas
  • oracle.forms.jdapi.Item
  • oracle.forms.jdapi.Window


for instance, here are the properties you can set to an alert:

 // String properties
setAlertMessage(String)
setBackColor(String)
setButton1Label(String)
setButton2Label(String
setButton3Label(String)
setComment(String)
setFillPattern(String)
setFontName(String
setForegroundColor(String)
setName(String
setTitle(String
setVisualAttributeName(String

// boolean properties
setSubclassObjectGroup(boolean)

// integer properties
setAlertStyle(int)
setDefaultAlertButton(int)
setFontSize(int)
setFontSpacing(int)
setFontStyle(int)
setFontWeight(int)
setLanguageDirection(int)


The implementation class of the Bean


     oracle.forms.fd.jdapiutil.JDAPIUtil


Register the bean:

FBean.Register_Bean('BL.BEAN', 1, 'oracle.forms.fd.jdapiutil.JDAPIUtil');


The methods you can call


Switch the logging mode:

FBean.Set_Property('BL.BEAN', 1, 'Log', true);


Set the log filename:

FBean.Set_Property('BL.BEAN', 1, 'LogFilename', 'c:/jdapiutil.log');


Process the XML file:

FBean.Invoke('BL.BEAN', 1, 'doProcess','XML_filename');


If you do not want to use this internal command (bug with some JREs) do as the following:


If internal Then
  FBean.Invoke('BL.BEAN', 1, 'doProcess',:BL.XMLFILE);
Else 
  Declare
    LC$Cmd Varchar2(512) ;
  Begin 
    LC$Cmd := 'cmd /c "' || :BL.JAVA || 'java.exe -classpath ' 
    || :BL.JAR_DIR || 'JDAPIUtil.jar;'
    || :BL.JAR_DIR || '
f90jdapi.jar; oracle.forms.fd.jdapiutil.JDAPIUtil '
    || :BL.XMLFILE || '"' ;
    host(LC$Cmd);
  End;

End if ; 
-- get the log file content --
:BL.LOG := FBean.Get_Property('BL.BEAN', 1, 'LogContent');
Go_Item('BL.LOG');
Edit_Textitem(10,10,500,400) ; 

In this code snippet, I used the Forms 9i version. If you use the Forms 10g version, replace f90jdapi.jar by frmjdapi.jar.

The :BL.JAVA field contains the directory name that contains the java.exe program (generally <devsuite_home>/jre/bin).
The :BL.JAR_DIR field contains the name of the directory where the JAR files are stored (generally <devsuite_home>/forms/java).


Run the program from the command line:

Assume the following:

The java.exe program is located in the C:
/Oracle/jdk/bin directory
The JAR files are located in the C:/Oracle/forms/java directory
The XML file full name is : C:/my_XML_file.xml

Open a DOS dialog box and e
nter the following command:

C:
/Oracle/jdk/bin/java.exe -classpath C:/Oracle/forms/java/JDAPIUtil.jar;C:/Oracle/forms/java/frmjdapi.jar; oracle.forms.fd.jdapiutil.JDAPIUtil C:/my_XML_file.xml


Get the log file content:

FBean.Set_Property('BL.BEAN', 1, 'LogFilename', 'c:/jdapiutil.log');

varchar :=
FBean.Get_Property('BL.BEAN', 1, 'LogContent');


The sample dialog


     . Download the jdapiutil.zip file
     . Unzip the file
     . copy the JDAPIUtil.jar file in the <ORACLE_HOME>/forms/java directory

     . Edit your /forms/server/formsweb.cfg file to add  JDAPIUtil.jar and f90jdapi.jar or frmjdapi.jar.
     . Open, compile and run the JDAPIUTIL.fmb module (Oracle Forms 9.0.2)


Documentation


See the XML syntax documentation

Download an XML file sample

Download the JDAPI documentation

Download the list of JDAPI integer constants

Download the complete JDeveloper project (that contains the Java source files)

You have to add the f90jdapi.jar (forms9i) or frmjdapi.jar (forms10g) to the project libraries.
You also have to indicate the oracle.forms.fd.jdapiutil.JDAPIUtil in the main class of the JAR deployment dialog.  

To implement this Bean in your Forms application, add the JDAPIUtil.jar and the f90jdapi.jar (Forms 9i) or the frmjdapi.jar (Forms 10g) to the archive and archive_jini tags of the /forms/server/forsweb.cfg file.


The JDAPIUtil.jar file read files from the client machine, so it needs to be signed.

Partager cet article
Repost0
19 septembre 2007 3 19 /09 /septembre /2007 10:00

Purpose

Here is a Java Bean to handle CLOB/NCLOB database columns in a Forms application.

It needs a database package to read the LOB data from the database, split into chunks in order to send them to Forms and finally to the JavaBean, and also to send back the modified text from the JavaBean to the database LOB column.

This package (PKG_CLOB), provided in the zip file, have functions and procedures to handle both CLOB and NCLOB columns.
It uses the EXECUTE IMMEDIATE function to Read and Write via full SQL orders passed as argument, so it is generic.

It has been successfully tested with Forms 10.1.2 and XE database.


Big Text Area


The Java code

     bigtextarea.java


The implementation class of the Bean Item

     oracle.forms.fd.TextArea


The methods you can call


Add text to the text item

Set_Custom_Property('BLOCK.ITEM',1,'ADD_TEXT','text');

e.g. :

LC$Text := 'Text to send to the bean' ;
Set_Custom_Property( 'BL.BEAN', 1, 'ADD_TEXT', LC$Text ) ; 
  

Use this method to read the database CLOB/NCLOB content then send it to the bean.

Here is a sample code you could write in a Post-Query trigger for instance:

Declare
  LN$Length  pls_integer ;
  LC$Chunk   Varchar2(32767) ;
  LN$Cpt     pls_integer := 0 ;
  LC$Req     Varchar2(1024);
Begin    
 
  ----------------------------------
  --  Build the Select SQL order  --
  ----------------------------------

  LC$Req := 'Select NTEXT From TEST_CLOB Where ID=1' ;
 
  ---------------------------------------
  --  select the database CLOB column  --
  ---------------------------------------

  If pkg_clob.select_nclob(LC$Req) then
    Loop
      -------------------------
      --  get the chunks...  --
      -------------------------

      LC$Chunk := pkg_clob.get_nchunk ;
      Exit when LC$Chunk is null ;
      LN$Cpt := LN$Cpt + 1 ;
      --------------------------------------
      --  ... then send them to the Bean  --
      --------------------------------------

      Set_Custom_Property('BLOCK3.BEAN',1, 'ADD_TEXT',LC$Chunk);
    End loop ;
    ---------------------------------
    --  display the complete text  --
    ---------------------------------

    Set_Custom_Property('BLOCK3.BEAN',1, 'SHOW','');
    ---------------------------
    --  get the text length  --
    ---------------------------

    LN$Length := Get_Custom_Property('BLOCK3.BEAN',1,'GET_LENGTH') ;
    message('length=' || LN$Length);    
  Else
    message('problem reading CLOB');      
  End if ;
 
end;


In this sample, we are selecting  the content of the NTEXT NCLOB column from the TEST_CLOB table.


Display the complete text

Set_Custom_Property('BL.BEAN',1,'SHOW','');

Use this method when all teh text chunks have been sent to the bean.


Clear the text

Set_Custom_Property('BL.BEAN',1,'CLEAR','');


The properties you can get from the JavaBean


Get the current text length

Varchar2 :=
Get_Custom_Property( 'BL.BEAN', 1, 'GET_LENGTH'
) ;


Get the current text chunks

Varchar2 :=
Get_Custom_Property( 'BL.BEAN', 1, 'GET_TEXT'
) ;

Use this method in a loop to get every chunk, then store them in the corresponding CLOB/NCLOB database column.

Here is a sample  code you can use in a Post-Insert or Post-Update trigger:

Declare
    LC$Chunk  Varchar2(32767) ;
    LC$Req    Varchar2(1024) ;
    LC$Msg    Varchar2(4000);
Begin  
    --------------------------------
    --  set the UPDATE SQL order  --
    --------------------------------

    LC$Req := 'Update TEST_CLOB Set NTEXT = :1 Where ID=1' ;
    -------------------------------------
    --  Init the transfer for a NCLOB  --
    -------------------------------------

    PKG_CLOB.Init_Transfer ( 'NCLOB' );
    Loop
      LC$Chunk := Get_Custom_Property('BLOCK3.BEAN',1,'GET_TEXT') ;
      Exit When  LC$Chunk Is Null ;
      ---------------------------------------
      --  Send the chunks to the database  --
      ---------------------------------------

      PKG_CLOB.Set_NChunk ( LC$Chunk ) ;
    End loop;
    ---------------------------------------------
    --  Update the CLOB/NCLOB database column  --
    ---------------------------------------------

    LC$Msg :=  PKG_CLOB.Transfer( LC$Req, 'NCLOB' ) ;
    If LC$Msg = 'OK' Then
     Forms_ddl('Commit') ;
    Else
         Message(LC$Msg);
    End if ;
End;

The writting process is done through three steps:

  • init the transfer by cleaning the target CLOB/NCLOB package's variable with Init_Transfer()
  • send the chunks to the database package to populate the package CLOB/NCLOB variable with Set_Chunk()
  • update the database row with the current CLOB/NCLOB variable with Transfer()


The sample dialog


     . Download the bigtextarea.zip file
     . Unzip the file
     . copy the bigtextarea.jar file in the <ORACLE_HOME>/forms/java directory
     . Edit your /forms/server/formsweb.cfg file to add  bigtextarea.jar .
     . If needed, create the database sample table (create_table_test_clob.sql)
     . create the database package (pkg_clob.sql)
     . Open, compile and run the BIGTEXT.fmb module (Oracle Forms 9.0.2)

Partager cet article
Repost0
15 septembre 2007 6 15 /09 /septembre /2007 09:51

Purpose

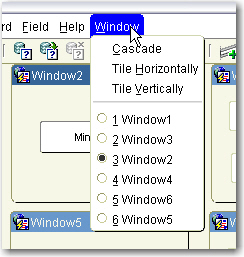
Here is a Java Bean to read the Window Forms menu option.

You have access to every window opened in the Forms application to minimize or restore them.


windowmenu1

windowmenu2

windowmenu3


The Java code

     WindowMenu.java


The implementation class of the Bean Item

     oracle.forms.fd.WindowMenu


The methods you can call


Scan the application to find every opened window

Set_Custom_Property('BLOCK.ITEM',1,'FIND_WINDOWS','');

e.g. :
Set_Custom_Property( 'BL.BEAN', 1, 'FIND
_WINDOWS', '' ) ;   


Minimize all windows

Set_Custom_Property('BLOCK.ITEM',1,'MINIMIZE_ALL','');


Minimize a single window

Set_Custom_Property('BLOCK.ITEM',1,'MINIMIZE_WINDOW','window_title');


Restore all windows

Set_Custom_Property('BLOCK.ITEM',1,'RESTORE_ALL','');


Restore a single window

Set_Custom_Property('BLOCK.ITEM',1,'RESTORE_WINDOW','window_title');


Set the window(s) bounds

Set_Custom_Property('BLOCK.ITEM',1,'SET_BOUNDS','param');

Where param is: WINDOW_NAME|ALL,x|-[,y|-[,width|-[,height|-]]]


Use the ALL keyword to move all the windows.
Use a - instead a value to skip its definition:

-- set all windows new X position to 30 pixels
Set_Custom_Property( 'BL.BEAN', 1, 'SET_BOUNDS', 'ALL,30,-'
) ;


-- set all windows X position to 10 and width to 100
Set_Custom_Property( 'BL.BEAN', 1, 'SET_BOUNDS', 'ALL,10,-,100,-'
) ;


The properties you can get from the JavaBean


Get the list of opened windows

Varchar2 :=
Get_Custom_Property( 'BL.BEAN', 1, 'GET_WINDOWS'
) ;

Returns a comma separated list like the following : Window 1,Window 2[,...]


The sample dialog


     . Download the windowmenu.zip file
     . Unzip the file
     . copy the windowmenu.jar file in the <ORACLE_HOME>/forms/java directory
     . Edit your /forms/server/formsweb.cfg file to add  windowmenu.jar .
     . Open and compile both the windowmenu.fmb and windowmenu2.fmb modules (Oracle Forms 9.0.2)
     . Compile all and run the windowmenu module

Partager cet article
Repost0
11 septembre 2007 2 11 /09 /septembre /2007 21:10

Purpose

Here is a Java Bean that allows reading, displaying with scaling and writing images.

(See the last  evolution of this solution here)


This Bean allows scaling images to fit the target item size, and includes a FileChooser with image preview dialog.


handleimage2

This JavaBean connects to the database through the JDBC driver to read and write the images, and does not need the Webutil library to pick up the image files from the JAR file, the client machine files or the Internet.


The Java code

     HandleImage.java     LectureBlob.java        GetImageFileName.java


The implementation class of the Bean Item

     oracle.forms.fd.HandleImage


The methods you can call


Set the connection string


Set_Custom_Property('BLOCK.ITEM',1,'SETCONN','the_connection_string');
e.g. :
Set_Custom_Property( 'BL.BEAN', 1, '
SETCONN', 'jdbc:oracle:thin:@my-machine:1521:XE' ) ;   
(Provide the complete jdbc:oracle:thin:... syntax)


Set the username


Set_Custom_Property('BLOCK.ITEM',1,'SETUSER','username');


Set the password

Set_Custom_Property('BLOCK.ITEM',1,'SETPWD','password');


Set the
database image table information

Set_Custom_Property('BLOCK.ITEM',1,'SETTABLEINFO','p1,p2');

p1 is the table name that holds the image Blob column
p2 is the Blob column name that holds the image

e.g.:
Set_Custom_Property( 'BLZ.BEAN', 1, 'SETTABLEINFO', 'PHOTOS,IMAGE' ) ;  

The instruction above indicates that the PHOTOS table handle images in the IMAGE Blob column..


Read an image from a file

Set_Custom_Property('BLOCK.ITEM',1,'READIMGFILE','the_complete_filename');

e.g.:
Set_Custom_Property( 'BLZ.BEAN', 1, 'READIMGFILE', 'D:/image.jpg' ) ; 


Read an image from the database table

Set_Custom_Property('BLOCK.ITEM',1,'READIMGBASE,'where_clause');

e.g.:
Set_Custom_Property( 'BLZ.BEAN', 1, 'READIMGBASE', 'IDENTIFIANT=20' ) ;  

where_clause is the SQL clause to identify a unique row to update in the table. The above instruction will be interpreted as :

   Select IMAGE From PHOTOS Where IDENTIFIANT=20


Put this method into the When-New-Record-Instance block-level trigger


Write an image to the database table

Set_Custom_Property('BLOCK.ITEM',1,'WRITEIMGFILE','where_clause');

e.g.:
Set_Custom_Property( 'BLZ.BEAN', 1, 'WRITEIMGBASE', 'IDENTIFIANT=20' ) ;  

where_clause is the SQL clause to identify a unique row to update in the table.
The above instruction will be interpreted as :

   Update PHOTOS Set IMAGE = ? Where IDENTIFIANT=20


Put this method into the Post-Insert and Post-Update block-level triggers


Clear the image

Set_Custom_Property( 'BL.BEAN', 1, '
CLEAR' , '' ) ;

This function has to be called in a When-New-Record-Instance trigger if the record does not exist:

When-New-Record-Instance trigger:
If :PHOTOS.IDENTIFIANT is not null Then
   Set_Custom_Property( 'BLZ.BEAN', 1, 'READIMGBASE', 'IDENTIFIANT=12' ) ;
Else
   Set_Custom_Property( 'BLZ.BEAN', 1, 'CLEAR', '' ) ;
End if ;
:BLZ.IMG_SIZE := Get_Custom_Property( 'BLZ.BEAN', 1, 'GETSIZE' ) ;


Set the display image scalling

This function concerns only the image displayed. The image stored with the WRITEIMGBASE method will be the initial image.

Set_Custom_Property( 'BL.BEAN', 1, '
SCALE_IMAGE
' , 'Width=x,Height=y' ) ;

Both Width and Height parameters must be transmitted

x and y can take the following values:


Any value greater than 0 that express an absolute size in pixels
the special value: FIT that extend to fit the exact size of the image panel' size
-1 that to keep the corresponding aspect ratio
0 that indicates no scale at all


Examples:


-- Scale the image to fit horizontally and vertically the image item --

Set_Custom_Property( 'BLZ.BEAN', 1, 'SCALE_IMAGE', 'Width=FIT,Height=FIT' ) ;

-- Scale the image to 200x100 pixels --
Set_Custom_Property( 'BLZ.BEAN', 1, 'SCALE_IMAGE', 'Width=200,Height=100' ) ;

-- Scale the image to 200 horizontal pixels and keep vertical aspect ratio --
Set_Custom_Property( 'BLZ.BEAN', 1, 'SCALE_IMAGE', 'Width=200,Height=-1' ) ;


Display/hide the image panel' scrollbars

Set_Custom_Property('BLOCK.ITEM',1,'SETSCROLL','true|false');


e.g.:
Set_Custom_Property( 'BLZ.BEAN', 1, 'SETSCROLL', 'true' ) ; 


Set the JFileChooser title and starting directory

Set_Custom_Property('BLOCK.ITEM',1,'SET_FILECHOOSER_TITLE','title[,directory]');

e.g.:
Set_Custom_Property( 'BLZ.BEAN', 1, 'SET_FILECHOOSER_TITLE', 'Select a file,D:/' ) ; 


Set the JFileChooser Look and Feel


Set_Custom_Property('BLOCK.ITEM',1,'SET_FILECHOOSER_LAF','SYSTEM|other_value');


e.g.:
-- use the current O.S. L&F --
Set_Custom_Property( 'BLZ.BEAN', 1, 'SET_FILECHOOSER_LAF', 'SYSTEM' ) ;
 

-- use the Metal L&F --
Set_Custom_Property( 'BLZ.BEAN', 1, 'SET_FILECHOOSER_LAF', 'JAVA' ) ;


Set the log mode to output the Bean messages

Set_Custom_Property( 'BLZ
.BEAN', 1, 'SETLOG' , 'true|false' ) ;


In the sample dialog provided, here is the code used in the When-New-Form-Instance trigger:

PROCEDURE InitForm IS
BEGIN
  -- switch the log to true --
  Set_Custom_Property( 'BLZ.BEAN', 1, 'SETLOG', 'true' ) ;
  -- set the baen image bckground color --
  Set_Custom_Property( 'BLZ.BEAN', 1, 'SETBG', '255,255,255' ) ;
  -- set the JDBC connection information --
  Set_Custom_Property( 'BLZ.BEAN', 1, 'SETCONN', 'jdbc:oracle:thin:@my-machine:1521:XE' ) ;
  Set_Custom_Property( 'BLZ.BEAN', 1, 'SETUSER', 'tutoforms' ) ;
  Set_Custom_Property( 'BLZ.BEAN', 1, 'SETPWD',  'tutoforms' ) ;
  -- set the image table and column name --
  Set_Custom_Property( 'BLZ.BEAN', 1, 'SETTABLEINFO',  'PHOTOS,PHOTO_JAVA,IDENTIFIANT' ) ;
  -- Set the JFileChooser title --
  Set_Custom_Property( 'BLZ.BEAN', 1, 'SET_FILECHOOSER_TITLE',  'Select an image file' ) ;
  -- Set the JFileChooser L&F --
  Set_Custom_Property( 'BLZ.BEAN', 1, 'SET_FILECHOOSER_LAF', 'SYSTEM' ) ;
  -- scalling properties --
  Set_Custom_Property( 'BLZ.BEAN', 1, 'SCALE_IMAGE' , 'Width=FIT,Height=FIT' ) ;
  -- display scrollbars policy --
  Set_Custom_Property( 'BLZ.BEAN', 1, 'SETSCROLL',  'false' ) ;
 
END;

Here is the description of the database table used:

CREATE TABLE PHOTOS
   (   
      "IDENTIFIANT" NUMBER(5,0) NOT NULL ENABLE,
      "NOM" VARCHAR2(50 BYTE),
      "PHOTO" BLOB,
      "PHOTO_JAVA" BLOB,
      CONSTRAINT "PHOTO_PK" PRIMARY KEY ("IDENTIFIANT") ENABLE
   )
/


The properties you can get from the JavaBean


Get the image size

Varchar2 :=
Get_Custom_Property( 'BL.BEAN', 1, 'GETSIZE'
) ;

The format returned (width,height) is like the following : 50,120


Get the
selected filename (JFileChooser)

Varchar2 :=
Get_Custom_Property( 'BL.BEAN', 1, 'GET_FILE_NAME'
) ;


This method, both open the JFileChooser dialog box, then returns the selected file.


Accessing to a remote database

Because the JavaBean is executed within an applet, it is not possible to connect to a remote database without a little adaptation:

   - first, the jar file must be signed.
   - second : you have to update the java.policy file stored in the Jinitiator directory

For example, to access to the database located on the machine-name server on the port 1524, add the following lines to the java.policy file:

C:/Program Files/Oracle/JInitiator 1.3.1.xx/lib/security/java.policy file


 permission java.net.SocketPermission "machine-name:1524-", "accept,connect,listen,resolve"; 

permission java.security.AllPermission;


The sample dialog


     . Download the handleimage2.zip file
     . Unzip the file
     . run the create_table.sql under the Oracle user you want to test (It creates the sample image table).
     . copy the handleimage2.jar file in the <ORACLE_HOME>/forms/java directory
     . Edit your /forms/server/formsweb.cfg file to add both handleimage2.jar and classes12.jar (the classes12.jar is located in the <DEV_HOME>/jdbc/lib directory. add a copy of this file in the <DEV_HOME>/forms/java directory).
     . Open the HANDLEIMAGE2.fmb module (Oracle Forms 10.1.2)
     . Compile all and run the module


Note : If you rebuild the jar file, it has to be signed. (the handleimage2.jar file provided in this article is already signed).
Partager cet article
Repost0